Crochetkari: Pattern links
Showing posts with label Pattern links. Show all posts

Sunday 28 September 2014

Corner to Corner Blanket Edging

Happy Navaratri to all my dear readers.  
Navaratri is a Hindu festival celebrated for nine nights (nava means nine and ratri means night), dedicated to the nine forms of Shakti the Mother Goddess. As with all other festivals in India, this festival too is celebrated in different ways in different parts of India, but always with great pomp and splendor involving a lot of color, lighting, music and dance. The tenth day is known as Vijayadashami or Dussehra which marks the victory of Goddess Durga over the demon Mahishasura as well the victory of Lord Ram over the Demon king Ravana.
Click the links in the above passage to know more about the festivals and the deities.


Some time back I showed you the corner to corner blanket I had made. It looked quite good as it was...without a border, but when I came across a pretty neat border pattern I had to add it to my blanket.

crochet c2c blanket edging

Isn't that spiffy! I love the knit-like effect of the stitch. My lovely friend Susan at Felted Button has a PDF pattern for the the blanket as well as the edging and its FREE!!

Here's a closer look:

crochet  c2c blanket edging


Teddy dear wants to sleep on the blankie  :)

crochet corner to corner blanket

The pattern by Susan is called Spring into Summer has detailed pics for the blanket as well as the edging.

I think the stitch is called crochet stockinette stitch (correct me if I am wrong). Mikey at Crochet crowd calls it the Camel stitch and he has a video which shows how to do the stitch.

So, how do you like my blanket? I think it is super cute. And so does BowWow!  :)

crochet corner to corner blanket

Did you like the edging? If you use this stitch in your project please do share your pics/blog post.

crochet corner to corner blanket

You can see this blanket in my Etsy Shop.

See you soon, Happy Crafting.


A small note: If you have any questions about patterns, hooks, yarns or anything else, please write to me only at crochetkari@gmail.com. This will help me to reply to you specifically and you will get faster replies

Monday 22 September 2014

Crochet flower pen drive cozy

Hello, lovely ladies! Thank you for joining me here. I am glad so many of you visited and liked my last post about the crochet peacock feather pen drive cozy. Thank you for your sweet comments, they really motivate me.

Here is the second pen drive cozy that I made. I had some flowers and leaves that I had made earlier from a pattern by Lucy at Attic24. They were supposed to be used as decoration for a bag. But the bag never saw the light of day!! So I joined them together to make this....

crochet flower pen drive cozy

While my second pen drive does have a cover I made the cozy just for fun.

crochet flower pen drive cozy

crochet flower pen drive cozy

crochet flower pen drive cozy

The leaves and fruits (tiny balls) prevent the pen drive from popping out and are also used for pulling it in.

Do you like it? Here is a look at the other side.

crochet flower pen drive cozy

Once again, here is the pattern link for the flower, and leaves and the little balls.

What crafty adventure have embarked upon...do let me know.
How many of you have already started making gifts for Christmas?
I am working on a cowl which is very pretty but involves a lot of color changing and weaving in of ends....grrrrr.....I hate weaving in ends(sigh)!!!!!

Hope you have a fantastic week ahead. Make time for craft everyday...it is the only stress buster you will ever need. See you soon.
Ciao  :)  :)  :)


A small note: If you have any questions about patterns, hooks, yarns or anything else, please write to me only at crochetkari@gmail.com. This will help me to reply to you specifically and you will get faster replies.
{This post contains affiliate links.}


Tuesday 16 September 2014

The secret inside the feather

Hello friends, so glad to see you here. I am back after two short trips to Mumbai, which is the reason I could not blog frequently. So, thank you for visiting me in spite of my long absence. I hope I was missed. A warm welcome to new friends who have joined me via Blogger, Bloglovin, Networked Blogs and Facebook.

My latest trip to Mumbai was our annual visit for the Ganesha festival (Ganeshotsav). I love being in Mumbai during this festival as the whole city is vibrant, colourful, fragrant with flowers, noisy with music blaring out from loudspeakers, with huge crowds everywhere as everyone wants to catch a glimpse (darshan) of their favourite deity. And the Ganesha idols (!) in all possible  sizes, heavily decorated with flowers, themed decorations and sometimes even real gold and silver!! Yes, that's right gold and silver. I have lots of photos and I will show them as soon as I am done processing them. You might enjoy this post I wrote long ago regarding the Ganesha festival.

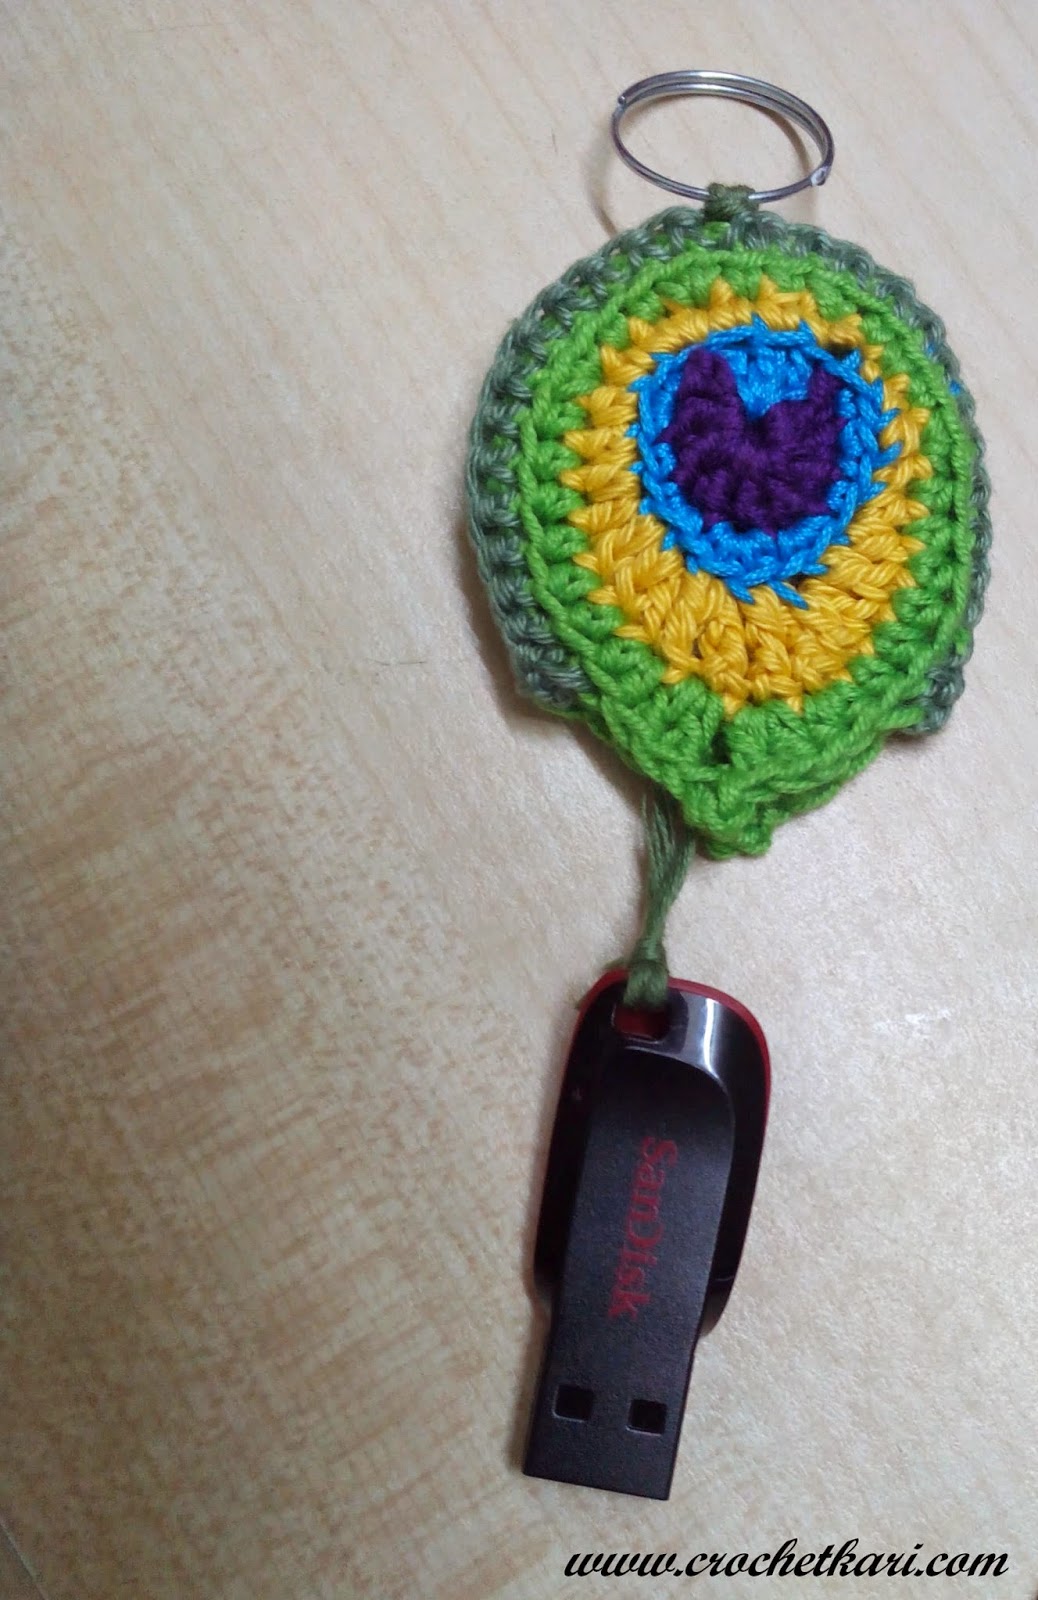
Now on to our favourite topic...crochet! Recently I came across a pattern for a lovely peacock feather and decided to give it a try.

crochetkari peacock feather

Isn't that pretty!! Since my first attempt was fiddly I decided to make one more. Now I had two feathers and I thought they were too pretty to let them languish in my workbasket. So I was looking for a way to use them. While they would make beautiful appliques, I wanted to do something unique with them.

Now, before I continue I must digress and tell you a small story. I love carrying pen drives with me, in my bag, as they are small, handy and a good way to carry my photos and patterns and even ebooks with me.  Over the years I have "lost" quite a few of these as my son keeps "borrowing" them. Somehow the borrowed pen drives never came back to me. Once I even tried attaching a jingly jangly charm with lots of shells and bells to make it look girly enough to prevent the said "borrowing", but no use as he just removed the charm and made off with the pen drive!!! Ufff...these kids, always one step ahead of you.

The two peacock feathers gave me an idea...that I could make a pen drive cozy by joining the two of them. So first I checked whether they will enclose my pen drive properly.

crochet peacock feather

Yay...it was a perfect fit. Another reason I wanted a pen drive cozy is that I had a San Disk pen drive which comes without a cover and are non retractable, and throwing them in my purse made them scratched and dirty. So... two birds with one stone it was! :-)

So I joined the two feathers together leaving an opening just wide enough, then inserted the pen drive attached to a thread. I used a ring from an old keychain. This ring prevents the pen drive from popping out of the cozy and was also handy for pulling it back into the cozy.

crochet peacock pen drive cozy


crochet peacock pen drive cozy

So what do you think? Do you like my crochet peacock pen drive cozy? Do let me know.

Yes, yes, I know the question you are dying to ask... the pattern for the feather. So, my dears, here is the LINK at Living the Craft Life. I think these feathers would be perfect as appliques, jewellery, key chains, purse charms, baggage tags and more.

I also loved the article she wrote about the birth of a crochet pattern... do read it. 

crochet peacock pen drive cozy

I don't know whether this cozy will prevent further "borrowing" of my pen drive but I enjoyed making it and that is all that matters!!  :) After all any excuse to crochet is a good excuse...isn't it?!

Hope to be back soon with some beautiful photos of Lord Ganesh and my next project which again happens to be a pen drive cozy. Yes, I can be crazy sometimes..hehe. Can you hear hubby in the background yelling 'What do you mean sometimes?'......LOL

Until then. Happy Crafting. And do write to me gorgeous ladies, I am really missing you.

If you sent me any questions by email and I have not replied, please send me a reminder. I am having some trouble commenting on other blogs, my comments are just not appearing, so while I have been visiting all my favourite blogs, I am sorry I could not leave a comment. Please bear with me. Maybe there is some error from my side. 


Tuesday 17 June 2014

Crochet Corner to Corner Blanket

Hello friends, Hope the week has started well for you.

First, I have a question for you. Do you have any favorite crochet teacher whom you follow on the internet?

Actually I follow a lot of crochet "gurus". I am a self taught crocheter and for many years i.e. until I discovered the joys of internet, books were my teachers. But now with the internet, there is an explosion of information on any topic under the sun, including Crochet. So while there are tons of free patterns available, there are also crochet videos galore, to learn any crochet technique  you want to - Entrelac, Tunisian, bobble stitch, crocodile stitch, ripples, or even crochet bags, blankets, hats, scarves and what have you!

One of my favorite crochet gurus is Mikey of The Crochet Crowd. Last year I made my very first Ripple Blanket (also my very first large project!) by participating in an Afghan challenge. According to Mikey the corner to corner crochet technique was "hot trending", so I decided to give it a try.

crochet crowd corner to corner throw

What do you think? Isn't it lovely?!! What is unique about this technique is that it starts out as a triangle and then you can modify the size as you crochet along. Which means you can make it a square or rectangle and even decide the size after you have started crocheting it.

Here is a link to Mikey's video for the corner to corner technique where he explains it in great detail.

I had not decided on a size for the blanket as I was hoping to get the two opposite corners to match each other. So two corners have the variegated yarn...

crochet crowd corner to corner throw

And since I had started with a blue triangle I was praying that I should be able to get blue again in the last corner.

crochet crowd corner to corner throw

I am sure that there must be a way to calculate and get precisely matching corners, but for now I am very happy with the results.

Crochet Corner to corner afghan

The yarn I used was "Fine" or yarn weight 2 and with a 3.5 mm hook, I was afraid that it will take me ages to complete the blanket. But this pattern is so simple and easy that once you get the hang of it you can do it while chatting with friends, watching TV, or even when waiting at the doctor's or the bus stop. Yes...it is that easy! Believe me you don't even have to look down at it.

So if you have never tried this technique, give it a go with this free pattern from Redheart.com. Redheart also has tons of other free patterns for any crochet item imaginable, so browse around while you are there.

If you don't have time to try an whole afghan, no problem, try your hand at the crochet corner to corner technique with this video for a C to C scarf. You will be amazed that such an easy technique can produce such beautiful results.

red heart corner to corner throw

I have to weave in the ends!!  :(

Do you think it needs an edging? Maybe you could suggest an edging pattern.

Crochet Corner to corner afghan

And before I sign off, a reminder about the pattern giveaway on my blog which is open till Saturday 28th June.

On my telly: Homeland. What about you?

Friday 28 March 2014

Crocheted Hook Case

Hi friends,

In my last post I showed you the two crochet hook cases made with the help of my sewing machine. I thought it was time my hooks made a home for themselves. Yes, I mean a crocheted crochet hook case.

I had saved a wonderful pattern for many years for a Aluminum hook case by Priscilla Hewitt (Click the link to go to her Free Patterns page which has some really wonderful patterns). It is a beautiful pattern but looked slightly complicated. I had a set of homeless aluminum hooks and now seemed like a good time to try the pattern.

My latest crochet hook case, Ta-dah...

Priscilla crochet hook case

Isn't it wonderful?!! The beauty of this pattern is that the hook pockets are formed as you crochet and there is no stitching/seaming involved (YAY). I have to admit I was skeptical about this and wondered whether I could manage it. But believe me it is easy peasy.

Priscilla hook case

The pockets take form and close automatically as you crochet.

Priscilla hook case

The outer side has a cross stitch pattern but you can use any favorite pattern.

Priscilla aluminum crochet hook case

I have used Laura Knitting cotton and a 3.50mm crochet hook. While the cotton yarn did give the case some stiffness, I wanted a firmer case so I cut up a (perfectly good) plastic table mat and inserted the pieces in between the fuchsia and sky blue layers... much to the  horror of my husband. Cutting up a functional household item for crochet!!! He is now convinced that he has married a crochet lunatic and has now started hiding his files and folders....haha  :)

A lovely case needs a beautiful button.

Priscilla aluminum crochet hook case

The pattern even produces a "spine" for the case on the outside making it look like a paperback.

Priscilla aluminum crochet hook case spine

So that is the story of how these hooks,


end up in their own little homes.

Priscilla aluminum crochet hook case

Here is the link once again for the pattern. Do give it a try along with the other fantastic patterns by Priscilla Hewitt.

See you soon. Until then, Happy Crafting.

Friday 21 March 2014

First Crochet Baby wear

Crochet Iris Toddler Top

Hi friends,
Today I am so pleased with myself and I am dying to share this project with you. Which is the lovely, very cute Crochet Iris Toddler Top that I have successfully managed to complete. And I am thrilled with the result.

So Ta-Dah...

Iris Toddler Top

Isn't it super duper cute!! I have no idea yet as to how it will look on a toddler as there is no "toddler model" anywhere close to me. But doesn't matter, I am still very very happy with it.

Are you thinking that I seem to be dizzy with excitement? Well, I have a right to be as this is my first successfully completed wearable item with shaping and measurements.

Do you remember THIS dress! Well, eventually it became a baby blanket...phew!!

Granny square frock

Doesn't that skirt look ridiculously huge!! Poor baby would have toppled over with the sheer weight of the dress...LOL.

And then there was THIS cardigan set...

crochet cardigan set freepatterns

The bonnet turned out quite nice but I am having some problem with the front of the cardigan even after working on it twice. Anyway it is in my WIPs basket...maybe some day I will feel the love for it again.  :)

So now on to my masterpiece (hehe)... You can find the pattern for this cute Iris Toddler Top at My Hobby is Crochet.com. (I like the name of the site) :) The designer Kinga has also released a new version of the pattern for 3 - 5 years, so take your pick.

The body of the top has two different shell patterns

Iris top detail

Iris top shell detail


The yoke has two tiny buttonholes and I used two pearls as buttons.

Crochet Iris top buttonholes


Iris Toddler top pearls

And the other side of the top...

Crochet toddler top

I am mighty pleased with it!! I think it looks very very cute. What do you say?

Now if only I could find a toddler to model it. Or maybe I could just wait for my grandchild...which means only a short wait of 5 - 6 years!  Oh no!!!!!!!

Crochet Iris Toddler top

So, what are you working on right now, do tell me. I am working on this stitch pattern which seems to be the current rage on the internet, wherever you turn....Facebook, Pinterest, crochet forums, ....this keeps popping up. It does not really require a pattern and I am hoping to have something nice to show you soon.

crochet interlocking pattern


Sunday 16 March 2014

Crochet Serenity Ripple scarf

Hello friends, Time is just flying and we are already into the third month of the year!

I am going to share one more item from my project collage. This is a wonderful ripple scarf and yes...it is a Free pattern. This scarf is made from the Serenity Ripple Scarf pattern at The Crochet Lounge. So, here goes:

Serenity ripple scarf

This is my second ripple project, the first one was this beautiful ripple blanket. But the scarf has a ripple pattern which is very different from the blanket.

The pattern is shown with gorgeous pink and purple but I quite like this combination of red and white too. Here is the stitch pattern in detail:

crochet ripple scarf detail

I added a fringe just for fun, the pattern has a different edging. The Crochet Lounge has lots of other free patterns for hats, cowls, wristers etc.

Crochet red and white ripple scarf

crochet serenity ripple scarf

See you soon, until then Happy Crafting. And before I sign off, here is some interesting information I found on Facebook;


Well, it is definitely reason number 4 for me!!  LOL

Ciao,

Printfriendly

Print Friendly and PDF

Disclosure:

Crochetkari is a participant in various Affiliate marketing programs such as ShareASale, Flipkart, Target and Amazon. Any links to these sites may yield me a small commission, upon purchase, at no extra cost to you. Disclosure