Crochetkari: crochet
Showing posts with label crochet. Show all posts

Monday 26 June 2023

Crochet Chevron Tulip Bag Free Pattern

Namaste Friends 🙏,

Hope you and your loved ones are in the pink of health and enjoying beautiful weather.

Mumbai is sweltering and we are desperately waiting for the rains.

I am on a stash busting spree and decided to use my worsted wt yarn to make a bag.

Ever thought you could make a bag with one granny square? Yes, that's right this bag is made with only one granny square. And if you use two or more colours, it brings out the chevron pattern in the bag beautifully!

tulip bag crochet pattern

* This post contains affiliate links which if you use for any purchase, may yield me a small commission, at no extra cost to you. Thank you. *
 
So let's begin,
 
Skill Level:    Easy                    

Size:  Bag measures approximately 16 inches wide and 16 inches tall
.          .
          The handle measures around 21 inches after being attached.
Materials:
·        Yarn -  Worsted weight cotton yarn* around 225 gms/ approx. 8 oz OR
          (75 gms of each colour if using 3 colours)  
·        Hooks - US 7 (4.50 mm),*   UK 7
.        Stitch Markers - 4  (Check out these super-cute markers on Etsy*)
.        Scissors*
.        Yarn needle*
.        Buttons - 4* (optional)
     
Notes:
·        This pattern uses US terminology.
·        Ch 3 at beginning of the round counts as stitch. 
.        The last corner on each round is made with (ch 1, sc) instead of ch 2.

Abbreviations: 
beg – beginning,  
ch - chain,  
st - stitch,
sk - skip
sp - space
sl st - slip stitch
nxt - next,
sc – single crochet, 
dc - double crochet
dc2tog - double crochet 2 stitches together
 

Instructions:  

The Base:

Ch 5, join with sl st to form a ring. OR use the magic ring.

Round 1:  Using colour A - Ch 3, working into the ring - 3dc, (ch 2, 4dc) 3 times, ending with ch 1, sc into 3rd ch of beg ch. (16 dc, 4 corner spaces)

Round 2: Ch 3, dc into sp below sc, * dc in each st across, in nxt ch-2 sp work (2dc, ch 2, 2dc), rep from *   3 times ending with 2 dc in last sp, ch 1, sc into 3rd ch of beg ch. (32 dc)

Rounds 3 to 9: Rep Round 2. In each round you will be increasing by 16 stitches.

Work the above rounds to get a base of your desired size. 

Feel free to make more or less rounds as required, as it will depend on the yarn you are using.


The Sides:

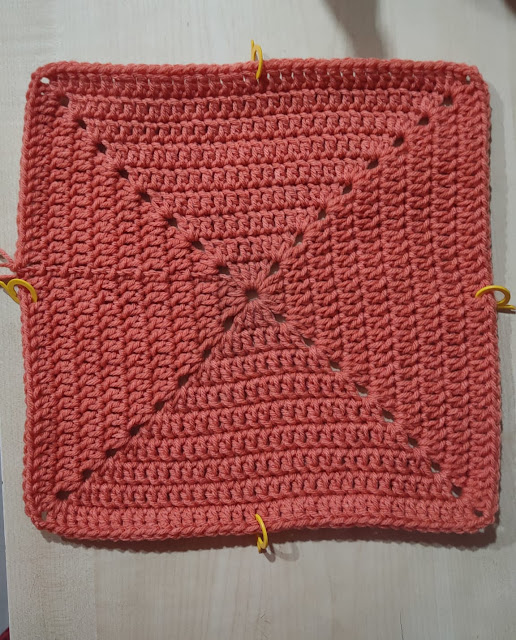
Round 10: In this round we will pinch the centre of each side to form an additional "corner".

Count the number of stitches on each side and divide by 2.  Since I worked 9 rounds I have 36 stitches on each side. Now place a marker between the 18th and the 19th dcs, repeat on the other 3 sides. As shown in the pic below:


crochet tulip bag base detail

Your base may have a different number of stitches depending on how many rounds you made for your base. Now let's begin,

Ch 3, dc in sp below sc, *dc in next 15 sts, dc2tog in the next 2 sts, sk nxt 2 sts (ie. the 2 sts on either side of the marker), dc2tog in the nxt 2 sts, dc in nxt 15 sts, in nxt ch-2 sp work (2dc, ch 2, 2dc), rep from * 3 times, ending with 2dc in the last sp, ch1, sc in 3rd ch of beg ch 3.

Rounds 11 to 16: Using colour B repeat Round 10.

Rounds 17 to 22: Using colour C repeat Round 10.

Round 23: Ch 1, sc in each st around working 3 sc in the ch-2 sps in the corners. Fasten off. Weave in all yarn ends using yarn needle.


crochet bucket bag pattern

The Handles:

Since I had a lot of yarn to consume I made yarn handles.

 
Row 1: Using colour A, ch 91, sk 1, sc in each st till the end. Fasten off. (90 sc)
Row 2: Using colour C, attach yarn with sl st in 1st sc, ch 1, sc in each st till end. Fasten off.
Row 3: Using colour B repeat Row 2. Fasten off, Weave in all ends using yarn needle. 
Attach the handles by threading the ends through the corner spaces, fold about an inch, and stitch together. 
Repeat for the second handle.
I added the buttons later just as a design feature.

Next time I am going to try Tunisian crochet for the handles.

crochet chevron bag pattern

I hope you try this pattern. I will be using this bag for carrying my projects with me because I crochet EVERYWHERE!!! 😄😄
 
crochet chevron tulip bag pattern


If you have any questions, suggestions, comments or you find a mistake or a typo in the pattern, please do write to me. 

Thank you for your time.
 
Contact me for online and offline personal crochet coaching, on Facebook or Instagram. 


Tuesday 11 April 2023

Cardamom Blossoms Cowl Free Crochet Pattern

Namaste friends 🙏,

How was the National Crochet Month for you? 
Did you crochet a new project or try a new crochet technique?

I decided to do something different this time, so rather than crocheting, I organised my yarn stash. The sheer amount of yarn I had accumulated over the years was mind-boggling!!

Now I understood the frequent lamentations from the Fam "Oh God, there's yarn everywhere in this house!". I am wondering if I will ever be able to crochet through the stash...

Do you know there is a name for this condition? It is called SABLE ie: "Stash Acquired Beyond Life Expectancy". I guess I will have to crochet even faster, shoulder pain notwithstanding. 

I have a new cowl pattern today, which I wanted to release last month but the above activity kept me busy.

free crochet pattern cardamom cowl

* This post contains affiliate links which if you use for any purchase, may yield me a small commission, at no extra cost to you. Thank you. *

The Name:

There was a time when crochet was very popular in India, and every household had at least a couple of crochet pieces made by the Grandmother or Great Grandmother. 
The art of crochet had different names in different languages, and even the different stitches have weird names. 
For eg: In Marathi, the language spoken in my home state Maharashtra, a literal translation of Single crochet is "Mute post". 
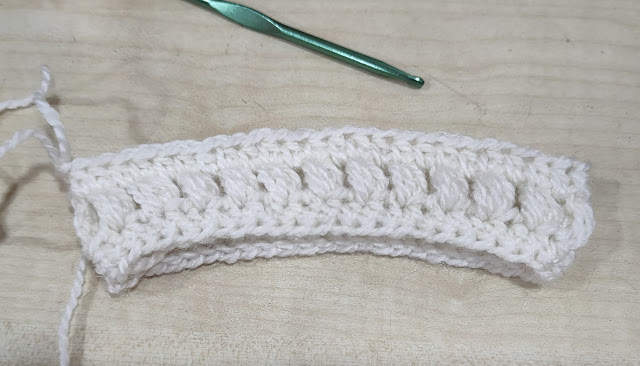
The Puff stitch was called "Velchi" or Cardamom because it does look like a cardamom pod. 

As this pattern had a lot of puff stitches I wanted to add the word in the name. And while I was looking up some pics of the plant I saw that my pattern does resemble the actual flower, hence Cardamom Blossoms Cowl. 
Yes, I can be weird at times, and my family will vouch for that. 😁

This pattern makes a great stash buster!

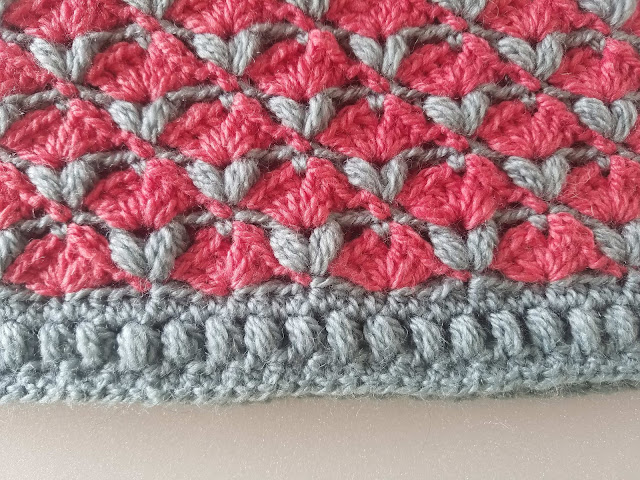
crochet cowl free pattern

Do not despair if, like me, you like in a tropical climate and will never be needing a cowl. 
This pattern is worked in the round, is seamless and would work wonderfully for a bag/purse.
If you need any help in making the bag just write to me.

So here goes the Cardamom Blossoms Cowl pattern:

Skill Level:    Easy                    

Size:  Cowl measures approximately 28 inches around and  9 inches 
wide 
          (71 cms by 23 cms).

Materials:
·        Yarn - DK weight yarn* around  110 gms/ approx. 3.90 oz (55 gms of each colour)  
·        Hooks - US G/6 (4.00 mm),* UK 8

Gauge:  11 rows and Two and half motifs in pattern  = 4".
     
Notes:
·        This pattern uses US terminology.
·        Ch 2 at beginning of the round counts as stitch.  
.        Ch 1 at beginning of the round does NOT count as a stitch.        
·        The pattern is worked in multiples of 8.

Abbreviations: 
beg – beginning,  
ch - chain,  
st - stitch,
sk - skip
sp - space
sl st - slip stitch
nxt - next,
sc – single crochet,
dc – double crochet,
hdc - half double crochet,
puff stitch - hdc3tog,
beg puff st - beginning puff st,
puff v-st - puff v-stitch
Shell st - (3dc, ch1, 3dc) in space indicated
beg shell st - beginning shell stitch,
rep – repeat

Pattern Stitches:
Beg Puff stitch - Into the stitch indicated work (ch2, hdc2tog).

Beg shell stitch - Into the space indicated work (ch3, 2 dc, ch 1, 3 dc).

Puff V-st - Into the stitch indicated work (puff st, ch 1, puff st).

Instructions:

Round 1: (Colour A) Ch 136, join in 1st ch with a sl st, ch2, hdc in nxt ch and each ch around (136 hdc).

Round 2: Ch 2, hdc2tog in same st, ch 1, sk 1, * puff st in nxt st, ch 1, sk 1, rep from * around ending with sl st into 1st hdc2tog.

Free crochet cowl pattern

Round 3: Ch 1, hdc in same st, hdc in ch-1 sp, * hdc in puff st, hdc in ch-1 sp, rep from * around ending with sl st in 1st hdc (136 hdc).

Cardamom blossoms cowl pattern

Round 4: (Colour B) Attach yarn with sc into 1st hdc below, * ch 1, sk 3, shell in nxt st, ch 1, sk 3, sc in nxt st, rep from * around ending with sl st in 1st sc (17 shells).

Crochet cowl cardamom blossoms


Round 5: (Colour A) Beg puff v-st in sc, ch 2, sk 1 ch, sk 3dc, sc in ch-1 sp (in centre of shell), ch 2, sk 3dc, sk ch 1, * puff v-st in sc below, ch 2, sk ch, sk 3dc, sc in ch-1 sp, ch 2, sk 3dc, sk ch 1, rep from * ending with sl st in 1st puff st.


Round 6: (Colour B) Beg shell in centre of puff v-st, ch 1, sk 2 ch, sc in sc below, ch 1, sk 2 ch, * shell in centre of puff v-st, ch 1, sk 2ch, sc in nxt st, ch 1, sk 2ch, rep from * around ending with sl st in 3rd ch of beg ch 3.


Round 7: (Colour A) * sc in ch-1 sp of shell, ch 2, sk 3dc, sk ch, puff v-st in sc, ch 2, sk ch1, sk 3dc, rep from * around ending with sl st in 1st sc. 


Round 8:  Repeat Round 6.

free crochet cowl pattern

Round 9: Repeat Round 5.

Rounds 10 to 19: Repeat Rounds 6 and 5

OR repeat Rounds 6 and 5 till you get the desired width, taking care to end with Round 5 ie the round with the puff v-sts.

cardamom blossoms free cowl pattern

Round 20: Repeat Round 6. Fasten off and weave in the end.

Round 21: Repeat Round 5. 

Round 22: (Colour A) Ch 2 (counts as hdc), * hdc in ch-1 sp, hdc in puff st, 2 hdc in ch-2 sp, hdc in sc, 2 hdc in ch-2 sp, hdc in puff st, rep from * around ending with sl st in 2nd ch of beg ch 2.

Round 23: Repeat Round 2.

Round 24: Repeat Round 3. Fasten off and weave in the end.


Crochet Tip: When working in the round with two or more colours, I prefer to fasten off the yarn without cutting it off and then pick it up when it is required. This works best for projects that are not reversible. Here's a pic that shows the wrong side of my Harmony cowl.


You can find the free pattern for the Harmony cowl HERE. 

I hope you will try this pattern. And maybe have a cup of cardamom tea while you are at it.


Thank you for your time.

Follow me on Instagram and Facebook to stay in the loop, and also to contact me for private crochet coaching sessions from anywhere in the world! 😀

* This post contains affiliate links which if you use for any purchase, may yield me a small commission, at no extra cost to you. Thank you.* 

Would you like a bag pattern using this stitch? Do let me know.

Friday 24 March 2023

Sharad Ritu Scarf Free Crochet Pattern

Namaste friends, 🙏

Hope you and your loved ones are healthy and joyful.

The year 2022 just flew by, but for all the good reasons.
After being under lockdown for almost two years, last year I travelled with a vengeance. 😀
But then it meant I couldn't blog, as access to the internet was an issue.

March is National Crochet Month (US) and it seemed like a good time to plunge back into the blogosphere. 

And I come bearing gifts, I mean a free crochet pattern. :)

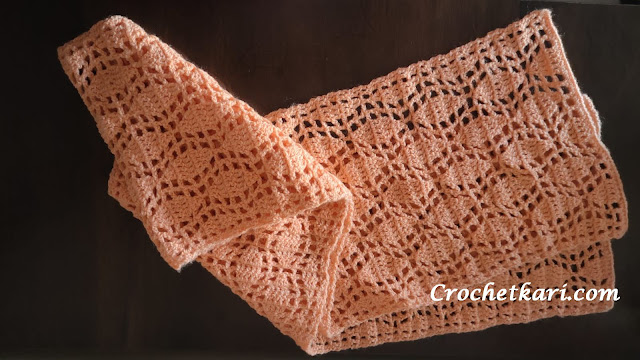
The free pattern is for a crochet scarf which I am going to call the Sharad Ritu scarf. 
Sharad Ritu is the Sanskrit name for the Autumn season. So you may call this scarf Autumn Leaves scarf or Falling leaves scarf as long as you please give this pattern a try and make the scarf.

* This post contains affiliate links which if you use for any purchase, may yield me a small commission, at no extra cost to you. Thank you. *

Sharad Ritu scarf crochet pattern

This pattern is very easy and uses only chain stitches and double crochets. 

So here goes the Sharad Ritu scarf pattern:

Skill Level:    Easy                    

Size:  Scarf measures approximately 72 inches  and  9.5 inches
          wide ( 182 cms by 24 cms).

Materials:
·        Yarn - DK weight yarn* around  190 gms/ approx. 6.70 oz   
·        Hooks - US G/6 (4.00 mm),* UK 8

Gauge:  8 rows and Two Leaves in pattern  = 4".
     
Notes:
·        This pattern uses US terminology.
·        Ch 2 at beginning of the row counts as first Dc.          
·        The pattern is worked in multiples of 16 + 7.
.        The pattern consists of 6 rows viz Row 2 to Row 7.


Abbreviations: 
beg – beginning,  
ch - chain,  
st - stitch,
sk - skip
sp - space
nxt - next,
sc – single crochet,
dc – double crochet,
dc2tog - double crochet 2 stitches together,
dc3tog - double crochet 3 stitches together,
rep – repeat

Autumn leaves scarf pattern


Instructions:
Row 1: Ch 56, sc in 2nd ch from hook, sc in each ch till the end. (55 sc)

Row 2: Ch 2, sk 1st st, dc in next st, ch 1, sk 1, dc in next st, ch 2, sk 2, dc in nxt st, * ch 2, sk 2, dc in nxt 5 sts, (ch 2, sk 2, dc in nxt st) 3 times, rep from * once, ch 2, sk 2, dc in nxt 5 sts, (ch 2, sk 2, dc in nxt st)twice, ch 1, sk 1, dc in last 2 sts. (29 dcs, 14 sps)

Row 3: Ch 2, dc in nxt st, ch 1, sk 1, 2 dc in nxt st, * ch 2, sk 2, dc in nxt st, ch 2, sk 2, dc2tog in nxt 2 sts, dc in nxt st, dc2tog in nxt 2 sts, ch 2, sk 2, dc in nxt st, ch 2, sk 2, 3dc in nxt st, rep from * once, ch 2, sk 2, dc in nxt st, ch 2, sk 2, dc2tog in nxt 2 sts, dc in nxt st, dc2tog in nxt 2 sts, ch 2, sk 2, dc in nxt st, ch 2, sk 2, 2dc in nxt st, ch 1, sk 1, dc in nxt 2 sts.  

Row 4: Ch 2, dc in nxt st, ch 1, sk 1, dc in nxt st, 2dc in nxt st, * ch 2, sk 2, dc in nxt st, ch 2, sk 2, dc3tog in nxt 3 sts, ch 2, sk 2, dc in nxt st, ch 2, sk 2, 2 dc in nxt st, dc in nxt st, 2dc in nxt st, rep from * once, ch 2, sk 2, dc in nxt st, ch 2, sk 2, dc3tog in nxt 3 sts, ch 2, sk 2, dc in nxt st, ch 2, sk 2, 2dc in nxt st, dc in nxt st, ch 1, sk 1, dc in last 2 sts. 

Row 5: Ch 2, dc in nxt st, ch 1, sk 1, dc in nxt 3 sts, * ch 2, sk 2, dc in nxt st, ch 2, sk 2, dc in nxt st, ch 2, sk 2, dc in nxt st, ch 2, sk 2, dc in nxt 5 sts, rep from * once, (ch 2, sk 2, dc in nxt st) 3 times, ch 2, sk 2, dc in nxt 3 sts, ch 1, sk 1, dc in last 2 sts.

Row 6: Ch 2, dc in nxt st, ch 1, sk 1, dc in nxt st, dc2tog in nxt 2 sts, * ch 2, sk 2, dc in nxt st, ch 2, sk 2, 3dc in nxt st, ch 2, sk 2, dc in nxt st, ch 2, sk 2, dc2tog in nxt 2 sts, dc in nxt st, dc2tog in nxt 2 sts, rep from * once, ch 2, sk 2, dc in nxt st, ch 2, sk 2, 3dc in nxt st, ch 2, sk 2, dc in nxt st, ch 2, sk 2, dc2tog in nxt 2 sts, dc in nxt st, ch 1, sk 1, dc in last 2 sts.

Row 7: Ch 2, dc in nxt st, ch 1, sk 1, dc2tog in nxt 2 sts, * ch 2, sk 2, dc in nxt st, ch 2, sk 2, 2dc in nxt st, ch 2, sk 2, dc in nxt st, ch 2, sk 2, dc3tog in nxt 3 sts, rep from * once, ch 2, sk 2, dc in nxt st, ch 2, sk 2, 2 dc in nxt st, dc in nxt st, 2dc in nxt st, ch 2, sk 2, dc in nxt st, ch 2, sk 2, dc2tog in nxt 2 sts, ch 1, sk 1, dc in last 2 sts. 

Repeat Row 2 to Row 7 till you reach your desired scarf length.

Then work Row 2 once.

Last Row: Ch1, sc in 1st st and every st across. (55 sc)

free scarf crochet pattern sharad ritu

I hope you will try this pattern.
Please let me know if you find a mistake or typo, which I'm sure I must have made in my excitement of "plunging" back. Haha!

Crochet Autumn scarf pattern

Enjoy making your Sharad Ritu scarf. 

Thank you for your time.

The ad-free printer-friendly PDF pattern for this scarf will be available on 

Ravelry

Etsy 

lovecrafts

CLICK HERE TO PIN THIS PATTERN


Follow me on Instagram and Facebook to stay in the loop and also to contact me for private crochet coaching sessions from anywhere in the world! 😀


* This post contains affiliate links which if you use for any purchase, may yield me a small commission, at no extra cost to you. Thank you.* 

Printfriendly

Print Friendly and PDF

Disclosure:

Crochetkari is a participant in various Affiliate marketing programs such as ShareASale, Flipkart, Target and Amazon. Any links to these sites may yield me a small commission, upon purchase, at no extra cost to you. Disclosure