Crochetkari: crochet tutorial
Showing posts with label crochet tutorial. Show all posts

Tuesday 11 April 2023

Cardamom Blossoms Cowl Free Crochet Pattern

Namaste friends 🙏,

How was the National Crochet Month for you? 
Did you crochet a new project or try a new crochet technique?

I decided to do something different this time, so rather than crocheting, I organised my yarn stash. The sheer amount of yarn I had accumulated over the years was mind-boggling!!

Now I understood the frequent lamentations from the Fam "Oh God, there's yarn everywhere in this house!". I am wondering if I will ever be able to crochet through the stash...

Do you know there is a name for this condition? It is called SABLE ie: "Stash Acquired Beyond Life Expectancy". I guess I will have to crochet even faster, shoulder pain notwithstanding. 

I have a new cowl pattern today, which I wanted to release last month but the above activity kept me busy.

free crochet pattern cardamom cowl

* This post contains affiliate links which if you use for any purchase, may yield me a small commission, at no extra cost to you. Thank you. *

The Name:

There was a time when crochet was very popular in India, and every household had at least a couple of crochet pieces made by the Grandmother or Great Grandmother. 
The art of crochet had different names in different languages, and even the different stitches have weird names. 
For eg: In Marathi, the language spoken in my home state Maharashtra, a literal translation of Single crochet is "Mute post". 
The Puff stitch was called "Velchi" or Cardamom because it does look like a cardamom pod. 

As this pattern had a lot of puff stitches I wanted to add the word in the name. And while I was looking up some pics of the plant I saw that my pattern does resemble the actual flower, hence Cardamom Blossoms Cowl. 
Yes, I can be weird at times, and my family will vouch for that. 😁

This pattern makes a great stash buster!

crochet cowl free pattern

Do not despair if, like me, you like in a tropical climate and will never be needing a cowl. 
This pattern is worked in the round, is seamless and would work wonderfully for a bag/purse.
If you need any help in making the bag just write to me.

So here goes the Cardamom Blossoms Cowl pattern:

Skill Level:    Easy                    

Size:  Cowl measures approximately 28 inches around and  9 inches 
wide 
          (71 cms by 23 cms).

Materials:
·        Yarn - DK weight yarn* around  110 gms/ approx. 3.90 oz (55 gms of each colour)  
·        Hooks - US G/6 (4.00 mm),* UK 8

Gauge:  11 rows and Two and half motifs in pattern  = 4".
     
Notes:
·        This pattern uses US terminology.
·        Ch 2 at beginning of the round counts as stitch.  
.        Ch 1 at beginning of the round does NOT count as a stitch.        
·        The pattern is worked in multiples of 8.

Abbreviations: 
beg – beginning,  
ch - chain,  
st - stitch,
sk - skip
sp - space
sl st - slip stitch
nxt - next,
sc – single crochet,
dc – double crochet,
hdc - half double crochet,
puff stitch - hdc3tog,
beg puff st - beginning puff st,
puff v-st - puff v-stitch
Shell st - (3dc, ch1, 3dc) in space indicated
beg shell st - beginning shell stitch,
rep – repeat

Pattern Stitches:
Beg Puff stitch - Into the stitch indicated work (ch2, hdc2tog).

Beg shell stitch - Into the space indicated work (ch3, 2 dc, ch 1, 3 dc).

Puff V-st - Into the stitch indicated work (puff st, ch 1, puff st).

Instructions:

Round 1: (Colour A) Ch 136, join in 1st ch with a sl st, ch2, hdc in nxt ch and each ch around (136 hdc).

Round 2: Ch 2, hdc2tog in same st, ch 1, sk 1, * puff st in nxt st, ch 1, sk 1, rep from * around ending with sl st into 1st hdc2tog.

Free crochet cowl pattern

Round 3: Ch 1, hdc in same st, hdc in ch-1 sp, * hdc in puff st, hdc in ch-1 sp, rep from * around ending with sl st in 1st hdc (136 hdc).

Cardamom blossoms cowl pattern

Round 4: (Colour B) Attach yarn with sc into 1st hdc below, * ch 1, sk 3, shell in nxt st, ch 1, sk 3, sc in nxt st, rep from * around ending with sl st in 1st sc (17 shells).

Crochet cowl cardamom blossoms


Round 5: (Colour A) Beg puff v-st in sc, ch 2, sk 1 ch, sk 3dc, sc in ch-1 sp (in centre of shell), ch 2, sk 3dc, sk ch 1, * puff v-st in sc below, ch 2, sk ch, sk 3dc, sc in ch-1 sp, ch 2, sk 3dc, sk ch 1, rep from * ending with sl st in 1st puff st.


Round 6: (Colour B) Beg shell in centre of puff v-st, ch 1, sk 2 ch, sc in sc below, ch 1, sk 2 ch, * shell in centre of puff v-st, ch 1, sk 2ch, sc in nxt st, ch 1, sk 2ch, rep from * around ending with sl st in 3rd ch of beg ch 3.


Round 7: (Colour A) * sc in ch-1 sp of shell, ch 2, sk 3dc, sk ch, puff v-st in sc, ch 2, sk ch1, sk 3dc, rep from * around ending with sl st in 1st sc. 


Round 8:  Repeat Round 6.

free crochet cowl pattern

Round 9: Repeat Round 5.

Rounds 10 to 19: Repeat Rounds 6 and 5

OR repeat Rounds 6 and 5 till you get the desired width, taking care to end with Round 5 ie the round with the puff v-sts.

cardamom blossoms free cowl pattern

Round 20: Repeat Round 6. Fasten off and weave in the end.

Round 21: Repeat Round 5. 

Round 22: (Colour A) Ch 2 (counts as hdc), * hdc in ch-1 sp, hdc in puff st, 2 hdc in ch-2 sp, hdc in sc, 2 hdc in ch-2 sp, hdc in puff st, rep from * around ending with sl st in 2nd ch of beg ch 2.

Round 23: Repeat Round 2.

Round 24: Repeat Round 3. Fasten off and weave in the end.


Crochet Tip: When working in the round with two or more colours, I prefer to fasten off the yarn without cutting it off and then pick it up when it is required. This works best for projects that are not reversible. Here's a pic that shows the wrong side of my Harmony cowl.


You can find the free pattern for the Harmony cowl HERE. 

I hope you will try this pattern. And maybe have a cup of cardamom tea while you are at it.


Thank you for your time.

Follow me on Instagram and Facebook to stay in the loop, and also to contact me for private crochet coaching sessions from anywhere in the world! 😀

* This post contains affiliate links which if you use for any purchase, may yield me a small commission, at no extra cost to you. Thank you.* 

Would you like a bag pattern using this stitch? Do let me know.

Sunday 21 March 2021

4 ways to work into a crochet stitch

Namaste friends,

I hope your life is flourishing in the “new normal” which was a gift from 2020.

Yes, 2020 was a tough year that left no one unscathed regardless of age, sex, race, wealth or profession!

It was also a year of learning, adjustment and innovation.

For me personally it meant doing something I love in a very different manner.

And that is teaching crochet. I love Crochet and I consider it a Life Skill rather than a craft and I think everybody should know how to crochet.

Since I couldn’t carry on with my in-person classes I had to learn how to take my classes online. At first, I was adamant that it was not possible but my family egged me on and I am so glad they did.

My students enjoyed the classes and sent me cute pictures of their projects upon completion of the course.

But, the most frequently asked beginner question was “Where do I insert the hook?”

Hence this post! :)

* This post contains affiliate links which if you use for any purchase, may yield me a small commission, at no extra cost to you. Thank you.

Now let us see the anatomy of a crochet stitch.

Parts of a crochet stitch

Firstly we have the Top of the stitch which looks like a little “v” also simply called “the stitch”.

The V consists of two loops, the loop closest to you is called the Front loop and the loop facing away from you is called the Back loop. 

This naming of the loops has nothing to do with the right side (front) of your project or the wrong side (back) of your project.

Then we have the Post or body of the stitch. The size of the post depends on the stitch made ie: single crochet, half double crochet or double crochet etc.

Lastly there is the base of the stitch, the place where the stitch originates, the part that is worked into the stitch or space below.

Normally when making a stitch we will insert our hook under Both loops of the V. This is an unspoken rule and holds true for all crochet patterns, unless the pattern mentions otherwise.


crochet under both loops

Here is a row of Dc stitches worked in both loops.


DC in both loops

If the pattern says work in “front loop only”, the hook is inserted in the loop closest to you, like so:

crochet in front loop only

And this is how it looks on the side you worked:

crochet in front loop only

and on the wrong side of the row:

dc in front loop

The unused back loop forms a ridge at the back.

If the pattern mentions work in “back loop only”, the hook is inserted in the loop away from you like so:

work in back loop crochet

And this is how it looks on the side you worked:

The unused front loops form a ridge in front.

And this is the wrong side of the row:

dc in back loop wrong side

Front loop and back loop stitches create ridges and are used to add texture to the item as in this "Single crochet in back loop only" ribbing for example.

scblo ribbing

In some patterns, after working one round in the front loops the next round is worked in the back loops to give a lovely 3D effect.

I have used this method in this clasp purse and crocheted in the loops separately to enclose the frame of the purse between the stitches so that the holes in the frame are not visible from any side.

crochet clasp purse

And now surprise surprise there is a third loop too! Right behind the “V” and it is a horizontal loop and looks like this:

work in horizontal loop

Working in the third loop produces even more texture as it pushes the whole V to the front.

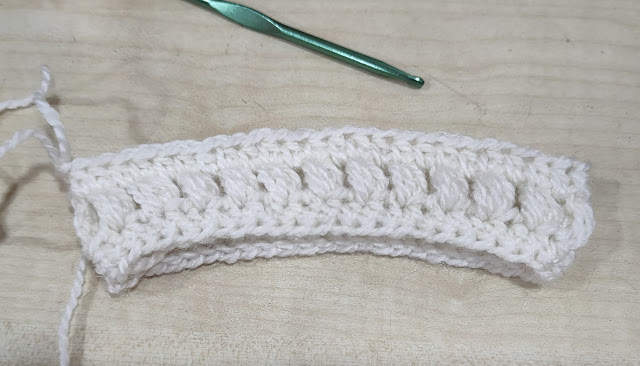
As you can see it in the Camel stitch. I have used the camel stitch as an edging for the Harmony Cowl which you can see HERE.

hdc in third loop

Wow, you are still with me! Thank you for your time. 
I hope you enjoyed this post and found it useful.

If your crochet item does not look like the picture given in the pattern, read the pattern once again and check if you made your stitches in the correct loop. :)

In the next post I will discuss about using the post and the base of the stitch.

Is there a crochet stitch/technique that you would like to know more about? Any questions, suggestions and comments are most welcome.

Happy crocheting! :)

* This post contains affiliate links which if you use for any purchase, may yield me a small commission, at no extra cost to you. Thank you.

Monday 7 January 2019

Crochet Hexagon Blanket - Half Hexagon pattern and Joining

Namaste friends, How has 2019 begun for you?

This year I have chosen "Persistence" as my Word of the Year. I think in 2018 I gave up very easily on things that could have been simply awesome. 

Yes, moving across states, an overseas trip, a change of job by hubby are facts that cannot be ignored. 
But, at the end of the day, these are just excuses and not reasons.

For now, let us "persist" with the hexagon blanket and proceed towards completion. :)


Crochet half hexagon free pattern


Crochet Half Hexagon pattern

Materials:
Yarn: DK wt yarn*
Hook: 4.5 mm*
Yarn needle
Quantity of yarn and blanket size will be updated upon completion.

Gauge: Each half hexagon is approx 4" from centre to side and 8.5" corner to corner

Note: Ch 3 at beg of each round counts as a dc.
          The pattern is written in US terms.

Stitch abbreviations (In US terms)
beg: beginning 
ch: chain
sl st; slip stitch
dc: double crochet
rep: repeat
sp: space
Rnd: round
nxt: next

Ch 4, join with sl st to form ring.

Rnd 1: Ch 3, dc into ring, ch 2, 2dc into ring, ch2, 2dc into ring. Turn. (6 dc, 2 ch-2 sps).

Rnd 2: Ch 3, dc in same st, dc in nxt st, (dc, ch 2, dc) into ch-2 sp,  dc in nxt 2 sts, (dc, ch 2, dc) into ch-2 sp, dc in nxt st, 2dc into top of beg ch 3. Turn. (12 dc, 2 ch-2 sps).

Rnd 3: Ch 3, dc in same st, dc in nxt 3 sts, (dc, ch 2, dc) into ch-2 sp, * dc in nxt 4 sts, (dc, ch 2, dc) into ch-2 sp, dc in nxt 3 sts, 2dc into top of beg ch 3. Turn. (18 dc, 2 ch-2 sps).

Rnd 4: Ch 3, dc in same st, dc in nxt 5 sts, (dc, ch 2, dc) into ch-2 sp,  dc in nxt 6 sts, (dc, ch 2, dc) into ch-2 sp, dc in nxt 5 sts, 2dc into top of beg ch 3. Turn. (24 dc, 2 ch-2 sps).

Rnd 5: Ch 3, dc in same st, dc in nxt 7 sts, (dc, ch 2, dc) into ch-2 sp,  dc in nxt 8 sts, (dc, ch 2, dc) into ch-2 sp, dc in nxt 7 sts, 2dc into top of beg ch 3. Turn. (30 dc, 2 ch-2 sps).

Rnd 6Ch 3, dc in same st, dc in nxt 9 sts, (dc, ch 2, dc) into ch-2 sp,  dc in nxt 10 sts, (dc, ch 2, dc) into ch-2 sp, dc in nxt 9 sts, 2dc into top of beg ch 3. Turn. (36 dc, 2 ch-2 sps).

Rnd 7: Ch 3, dc in same st, dc in nxt 11 sts, (dc, ch 2, dc) into ch-2 sp,  dc in nxt 12 sts, (dc, ch 2, dc) into ch-2 sp, dc in nxt 11 sts, 2dc into top of beg ch 3. 
Fasten off (42 dc, 2 ch-2 sps).

Get the free pattern for the full hexagons in this post.

Joining the Hexagons

Hexagons can be joined using many different methods. 
For this blanket, I joined the hexagons by slip stitching them together in the back loops only.

Here a photo tutorial:


How to join crochet hexagons using slip stitch in back loops only crochetkari

How to join crochet hexagons using slip stitch in back loops only crochetkari

Hold two hexagons with the right sides together. With a slip knot on the hook, insert hook into the second ch of the ch-2 space on both hexagons, yarn over and pull through all 3 loops.


How to join crochet hexagons using slip stitch in back loops only crochetkari

Now insert hook into the back loops only of the next stitch on both hexagons.


How to join crochet hexagons using slip stitch in back loops only crochetkari

Once again yarn over and pull through all 3 loops on hook.  Slip stitch in back loops only is done.


How to join crochet hexagons using slip stitch in back loops only

Continue slip stitching through the back loops of remaining stitches.
Then, slip stitch through the first ch of the ch-2 space.

Crochet quite loosely ensuring there are no puckers and don't join too many hexagons at one go, or else the hexagons turn into bowls.
Ask me how I know...LOL!


How to join crochet hexagons using slip stitch in back loops only crochetkari

This is how the seam will look on the wrong side.


How to join crochet hexagons using slip stitch in back loops only crochetkari

And here is a look at the front side, with the seam not visible at all.


How to join crochet hexagons using slip stitch in back loops only

Now, we will attach the next hexagon by holding it right sides together, just like before.
Insert hook into the second chain of ch-2 space on BOTH hexagons. Yarn over and pull through all loops.


How to join crochet hexagons using slip stitch in back loops only crochetkari

Proceed as before by slip stitching through the back loops of remaining stitches
End with slip stitch in first ch of ch-2 space.


How to join crochet hexagons using slip stitch in back loops only crochetkari

Each ch in the ch-2 sp is joined to the adjacent hexagon. Three hexagons will join at any corner.

You can follow this exact method to SEW your hexagons together using a sewing needle, but I prefer to crochet them together.

I hope you found this tutorial useful. Do give this blanket a try as it is a very, very simple pattern.

Now off I go to decide a border for this blanket.

Let me know if you have any queries. Happy crocheting.


This post contains affiliate links which if you use for any purchase, may yield me a small commission, at no extra cost to you. Thank you.


Tuesday 8 March 2016

How to follow crochet patterns and charts (Videos)

Namaste friends,

NatCroMo

Let's celebrate the glory, beauty and strength of being a woman. The celebrations don't end here as it is also National Crochet Month (NatCroMo).  Okay I know it is not NatCroMo in India but as they say "it is 5 o'clock somewhere in the world", so it is NatCroMo in the US and that is good enough for a celebration :) I am hoping to keep my posts crochet related this month, fingers crossed. 

Are you aware of "Word of the Year", this is something I discovered in 2016. On the personal front my word is Declutter and I have been pretty successful so far. You have no idea how difficult it has been as I am an extreme hoarder. Yes, I never throw away Anything! Which means I have all the greeting cards I have ever received, penpal letters, patterns saved from magazines etc., the smallest scrap of remnant yarn, CDs we don't listen to anymore, favorite clothes which don't fit my "slim" form and may never will, and everything in my kitchen has to be in multiples!! But I am very pleased that I am making good progress and I hope this continues till the end of the year.

In my crochet life, the word of the year 2016 is CAL (Crochet-Along). I have already started a few and more are on my list. Hopefully I should complete them all this year. More details about the CALs in another post.

Let us get on with celebrating NatCroMo. How about starting at the very beginning? So, tell me; 
  •  When did you learn to crochet? 
  •  Who taught you to crochet?  
  •  Do you dabble in any other crafts? 
I am a self taught crocheter and I bought my very first crochet books at the age of 15 and I have never kept my hook down ever since. Initially I followed written patterns and it was after I bought a Spanish crochet leaflet that I learned to follow crochet symbol charts. Today I am surprised that I managed it all on my own! Must be the spirit of youth. :)
Are you comfortable with written crochet patterns or do you find it easier to follow crochet symbol charts?
I found two wonderful videos that are going to solve the problem for both groups. The first video is by crochet designer Marly Bird, where she explains how to follow crochet symbol charts in great detail putting an end to any guesswork.
 

 Click HERE if you have any problem watching the video above.
The next video is by Kristen at GoodKnit Kisses where she explains crochet pattern reading in wonderful detail literally reading it word by word.
 

Click HERE  in case the video above does not play.

I hope you enjoy both the videos. While I am addicted to crochet, I also like to knit, paint and dabble a bit in embroidery, sewing and macramé. What about you? Are you multicraftual? (Yes, it is a word...haha)

See you soon. Keep crafting and revel in being a woman.

Printfriendly

Print Friendly and PDF

Disclosure:

Crochetkari is a participant in various Affiliate marketing programs such as ShareASale, Flipkart, Target and Amazon. Any links to these sites may yield me a small commission, upon purchase, at no extra cost to you. Disclosure