Crochetkari

Monday 7 January 2019

Crochet Hexagon Blanket - Half Hexagon pattern and Joining

Namaste friends, How has 2019 begun for you?

This year I have chosen "Persistence" as my Word of the Year. I think in 2018 I gave up very easily on things that could have been simply awesome. 

Yes, moving across states, an overseas trip, a change of job by hubby are facts that cannot be ignored. 
But, at the end of the day, these are just excuses and not reasons.

For now, let us "persist" with the hexagon blanket and proceed towards completion. :)


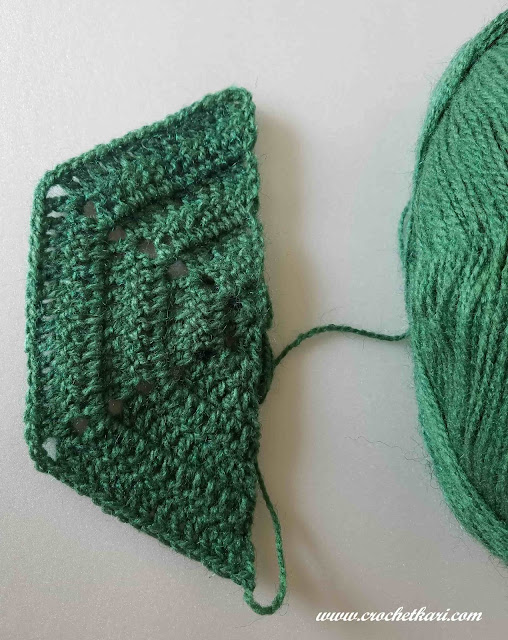
Crochet half hexagon free pattern


Crochet Half Hexagon pattern

Materials:
Yarn: DK wt yarn*
Hook: 4.5 mm*
Yarn needle
Quantity of yarn and blanket size will be updated upon completion.

Gauge: Each half hexagon is approx 4" from centre to side and 8.5" corner to corner

Note: Ch 3 at beg of each round counts as a dc.
          The pattern is written in US terms.

Stitch abbreviations (In US terms)
beg: beginning 
ch: chain
sl st; slip stitch
dc: double crochet
rep: repeat
sp: space
Rnd: round
nxt: next

Ch 4, join with sl st to form ring.

Rnd 1: Ch 3, dc into ring, ch 2, 2dc into ring, ch2, 2dc into ring. Turn. (6 dc, 2 ch-2 sps).

Rnd 2: Ch 3, dc in same st, dc in nxt st, (dc, ch 2, dc) into ch-2 sp,  dc in nxt 2 sts, (dc, ch 2, dc) into ch-2 sp, dc in nxt st, 2dc into top of beg ch 3. Turn. (12 dc, 2 ch-2 sps).

Rnd 3: Ch 3, dc in same st, dc in nxt 3 sts, (dc, ch 2, dc) into ch-2 sp, * dc in nxt 4 sts, (dc, ch 2, dc) into ch-2 sp, dc in nxt 3 sts, 2dc into top of beg ch 3. Turn. (18 dc, 2 ch-2 sps).

Rnd 4: Ch 3, dc in same st, dc in nxt 5 sts, (dc, ch 2, dc) into ch-2 sp,  dc in nxt 6 sts, (dc, ch 2, dc) into ch-2 sp, dc in nxt 5 sts, 2dc into top of beg ch 3. Turn. (24 dc, 2 ch-2 sps).

Rnd 5: Ch 3, dc in same st, dc in nxt 7 sts, (dc, ch 2, dc) into ch-2 sp,  dc in nxt 8 sts, (dc, ch 2, dc) into ch-2 sp, dc in nxt 7 sts, 2dc into top of beg ch 3. Turn. (30 dc, 2 ch-2 sps).

Rnd 6Ch 3, dc in same st, dc in nxt 9 sts, (dc, ch 2, dc) into ch-2 sp,  dc in nxt 10 sts, (dc, ch 2, dc) into ch-2 sp, dc in nxt 9 sts, 2dc into top of beg ch 3. Turn. (36 dc, 2 ch-2 sps).

Rnd 7: Ch 3, dc in same st, dc in nxt 11 sts, (dc, ch 2, dc) into ch-2 sp,  dc in nxt 12 sts, (dc, ch 2, dc) into ch-2 sp, dc in nxt 11 sts, 2dc into top of beg ch 3. 
Fasten off (42 dc, 2 ch-2 sps).

Get the free pattern for the full hexagons in this post.

Joining the Hexagons

Hexagons can be joined using many different methods. 
For this blanket, I joined the hexagons by slip stitching them together in the back loops only.

Here a photo tutorial:


How to join crochet hexagons using slip stitch in back loops only crochetkari

How to join crochet hexagons using slip stitch in back loops only crochetkari

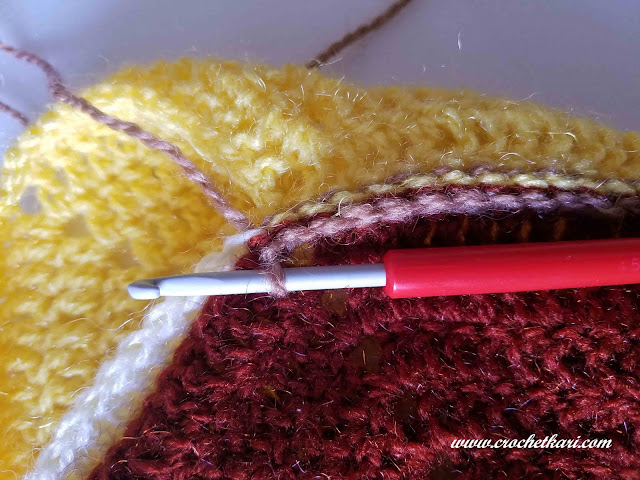
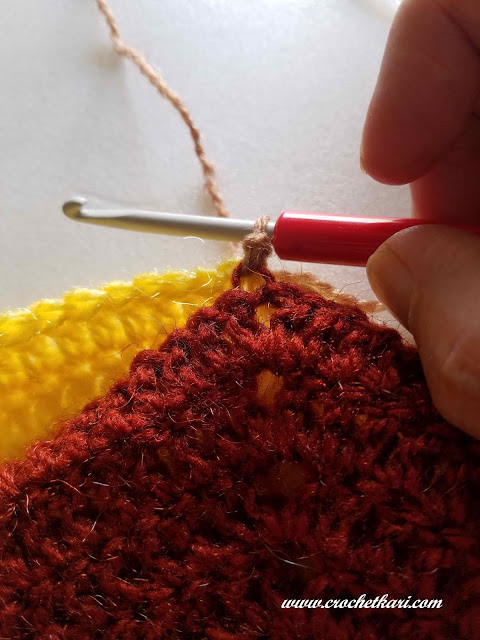
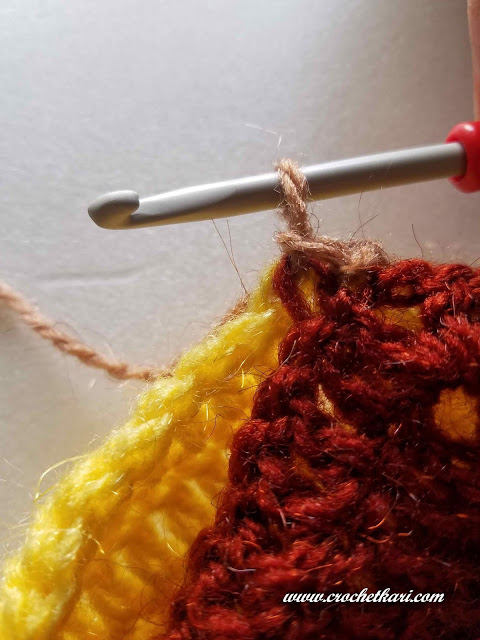
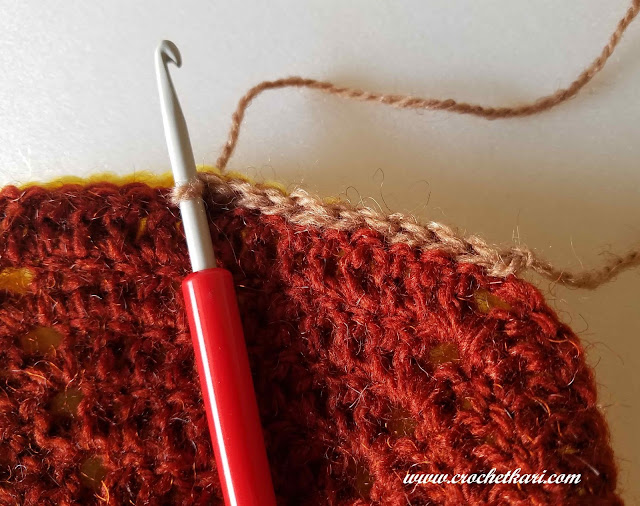
Hold two hexagons with the right sides together. With a slip knot on the hook, insert hook into the second ch of the ch-2 space on both hexagons, yarn over and pull through all 3 loops.


How to join crochet hexagons using slip stitch in back loops only crochetkari

Now insert hook into the back loops only of the next stitch on both hexagons.


How to join crochet hexagons using slip stitch in back loops only crochetkari

Once again yarn over and pull through all 3 loops on hook.  Slip stitch in back loops only is done.


How to join crochet hexagons using slip stitch in back loops only

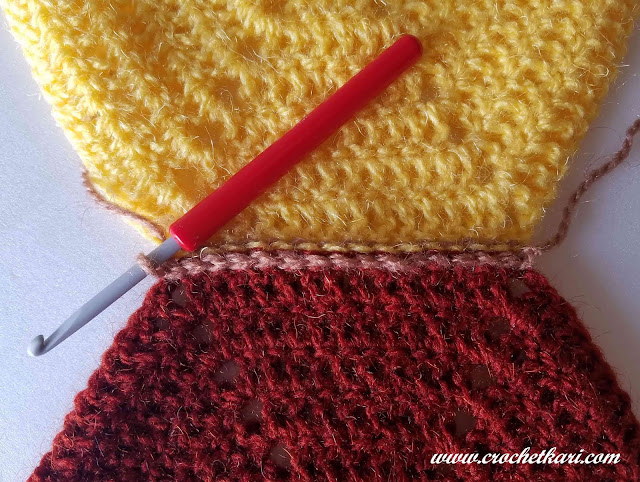
Continue slip stitching through the back loops of remaining stitches.
Then, slip stitch through the first ch of the ch-2 space.

Crochet quite loosely ensuring there are no puckers and don't join too many hexagons at one go, or else the hexagons turn into bowls.
Ask me how I know...LOL!


How to join crochet hexagons using slip stitch in back loops only crochetkari

This is how the seam will look on the wrong side.


How to join crochet hexagons using slip stitch in back loops only crochetkari

And here is a look at the front side, with the seam not visible at all.


How to join crochet hexagons using slip stitch in back loops only

Now, we will attach the next hexagon by holding it right sides together, just like before.
Insert hook into the second chain of ch-2 space on BOTH hexagons. Yarn over and pull through all loops.


How to join crochet hexagons using slip stitch in back loops only crochetkari

Proceed as before by slip stitching through the back loops of remaining stitches
End with slip stitch in first ch of ch-2 space.


How to join crochet hexagons using slip stitch in back loops only crochetkari

Each ch in the ch-2 sp is joined to the adjacent hexagon. Three hexagons will join at any corner.

You can follow this exact method to SEW your hexagons together using a sewing needle, but I prefer to crochet them together.

I hope you found this tutorial useful. Do give this blanket a try as it is a very, very simple pattern.

Now off I go to decide a border for this blanket.

Let me know if you have any queries. Happy crocheting.


This post contains affiliate links which if you use for any purchase, may yield me a small commission, at no extra cost to you. Thank you.



Sunday 30 December 2018

Happy New Year 2019!


Happy New Year 2019 crochetkari

Namaste, my lovely friends,

May the New Year bring you Good Health, Joyous moments with your Loved Ones, Peace and Contentment and of course Lots of Crafty Goodness!!

Recently I downloaded a planner that had a section for "Twenty before 2020".
I think it is a great idea. I am definitely going to make my list.

Why don't you give it a try? It will be fun to come back to the list in January 2020 and check how many of the goals you have achieved.

See you in the New Year!

Wednesday 19 December 2018

Crochet Hexagon Blanket Free Pattern

Namaste friends, how are you?
Busy with your gift making/buying? Or are you lucky enough to reach the gift wrapping stage!

Let me help you with these ready-in-a-jiffy Free crochet patterns for a scarf and cowl.

November really flew by and for me, the main reasons were Diwali celebrations and long road trips. Since I don't drive, I am always in the passenger seat. And just staring out of the window while twiddling your thumbs seems like a crime to me! 

So I needed a crochet project that I could easily carry with me and it had to be easy enough to crochet in a moving car while occasionally admiring the passing scenery. 

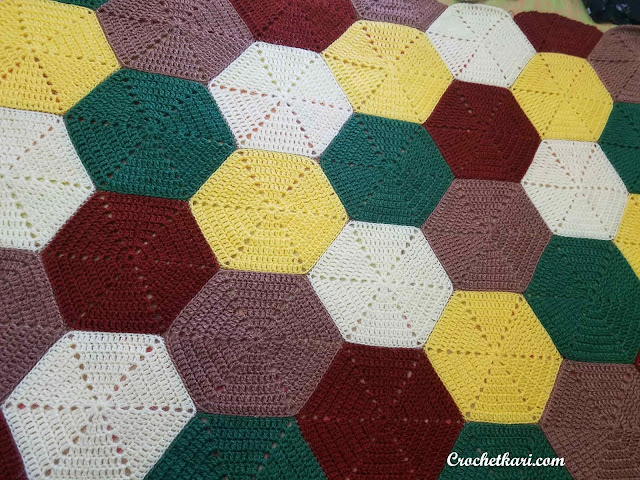
Crochetkari hexagon blanket pattern


The Hexagon crochet blanket seemed an ideal project to carry along. The hexagon pattern is very easy, in fact you could actually crochet it while looking out of the window. 

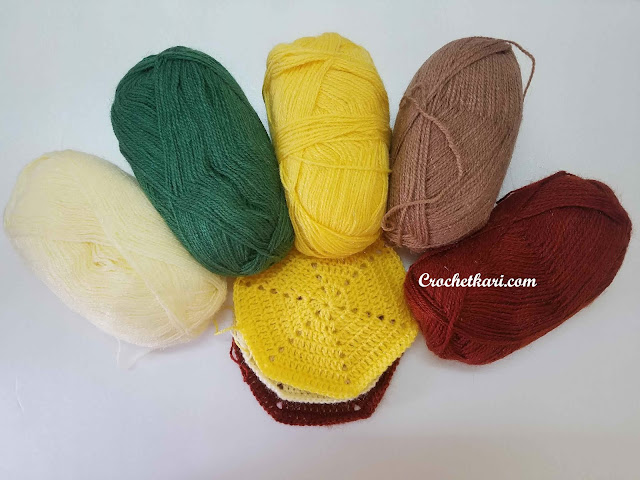
I decided to go for a new colour scheme, something different from my usual choice of bright colours. I think I would call this a woodland colour scheme with its brown, green and yellow colours. Do you like this colour combination?

Crochetkari hexagon blanket pattern

I have used an Indian yarn called Ruby Grande.

Crochet Hexagon Pattern

Materials:
Yarn: DK wt yarn*
Hook: 4.5 mm
Yarn needle
Quantity of yarn and blanket size will be updated upon completion.

Gauge: Each hexagon is approx 7.5" side to side and 8.5" corner to corner

Note: Ch 3 at beg of each round counts as a dc.
          The pattern is written in US terms.

Stitch abbreviations (In US terms)
beg: beginning 
ch: chain
sl st; slip stitch
dc: double crochet
rep: repeat
sp: space
Rnd: round
nxt: next

Ch 4, join with sl st to form ring.

Rnd 1: Ch 3, dc into ring, ch 2, (2dc into ring, ch2) 5 times, join with sl st into top of beg ch 3. (12 dc, 6 ch-2 sps)

Rnd 2: Ch 3, dc in nxt st, (dc, ch 2, dc) into ch-2 sp, * dc in nxt 2 sts, (dc, ch 2, dc) into ch-2 sp,* repeat from * around, join with sl st into top of beg ch 3. (24 dc, 6 ch-2 sps)

Rnd 3: Ch 3, dc in nxt 2 sts, (dc, ch 2, dc) into ch-2 sp, * dc in nxt 4 sts, (dc, ch 2, dc) into ch-2 sp,* repeat from * around, dc in nxt st, join with sl st into top of beg ch 3. (36 dc, 6 ch-2 sps)

Rnd 4: Ch 3, dc in nxt 3 sts, (dc, ch 2, dc) into ch-2 sp, * dc in nxt 6 sts, (dc, ch 2, dc) into ch-2 sp,* repeat from * around, dc in nxt 2 sts, join with sl st into top of beg ch 3. (48 dc, 6 ch-2 sps)

Rnd 5: Ch 3, dc in nxt 4 sts, (dc, ch 2, dc) into ch-2 sp, * dc in nxt 8 sts, (dc, ch 2, dc) into ch-2 sp,* repeat from * around, dc in nxt 3 sts, join with sl st into top of beg ch 3. (60 dc, 6 ch-2 sps)

Rnd 6Ch 3, dc in nxt 5 sts, (dc, ch 2, dc) into ch-2 sp, * dc in nxt 10 sts, (dc, ch 2, dc) into ch-2 sp,* repeat from * around, dc in nxt 4 sts, join with sl st into top of beg ch 3. (72 dc, 6 ch-2 sps)

Rnd 7: Ch 3, dc in nxt 6 sts, (dc, ch 2, dc) into ch-2 sp, * dc in nxt 12 sts, (dc, ch 2, dc) into ch-2 sp,* repeat from * around, dc in nxt 5 sts, join with sl st into top of beg ch 3. (84 dc, 6 ch-2 sps). Fasten off.

As you can see it is a very simple pattern. The hexagons grow with each addition of (dc, ch2, dc) into the corner ch-2 spaces. I decided to go for seven rounds as I wanted big hexagons. You can make your hexagons any size you like. 

In fact, with a chunky yarn, you could go on increasing and end up with a lovely hexagon blanket/rug.

Some patterns call for ch 3 at the corners, but for this blanket, I found that ch 2 was sufficient. Feel free to adapt the pattern to suit your purpose.

Here are the hexagons all joined together. I was going to stop here but the colours and the size of the hexagons seemed "too loud" for a baby blanket so I am going to add a few more motifs and make it a throw.

Crochetkari hexagon blanket pattern

Joining the hexagons

For my first hexagon blanket - which you can see HERE I used the join-as-you-go method also known as JAYGO. But as this blanket was supposed to be a portable project I made all the hexagons first and then joined them.

The hexies are joined on the wrong side by slip stitching into the back loops only. I will go into detail in my next post.

I wanted the colour placement to be random. But "random" is something that just does not come easily to me. Maybe it is the Virgo in me, Lol!

So I came up with this chart to help me.

crochet hexagon blanket free pattern crochetkari

I love this method of joining as the hexagons seem to magically float next to each other and the actual joining needs only 2-3 days, (speed depending on what's on the telly). LOL! 

Crochetkari hexagon blanket pattern

I had blocked the blanket but as I plan to add more motifs it is still a WIP.

I wanted to keep the sides straight so I have added half hexagons to the sides. The top and bottom edges will remain rippled.

Any suggestions for a border for this blanket are most welcome. :)
Please let me have your ideas in the comments.

Check out the half hexagon pattern and joining process in detail, in this next post.

Until then, Happy crafting! :)


* This post contains affiliate links which if you use for any purchase, may yield me a small commission, at no extra cost to you. Thank you.

Tuesday 23 October 2018

Flowers in my window cowl crochet pattern

Namaste friends. Sharing my latest pattern - the Flowers in my window cowl crochet pattern.

Did you have pen friends when you were a teen? My brother and I had lots of pen pals all over the globe. Wonder where I am going with this? :)

Our European pen pals would send us beautiful photos in which the houses would have these beautiful boxes in the windows filled with gorgeous colourful flowers. Those lovely flowers were the inspiration behind the name of this cowl. 

Sadly, no one uses snail mail anymore and we are no longer in touch with our pen pals. Somehow an email does not have the same warmth as a beautifully written long letter filled with anecdotes and juicy gossip.

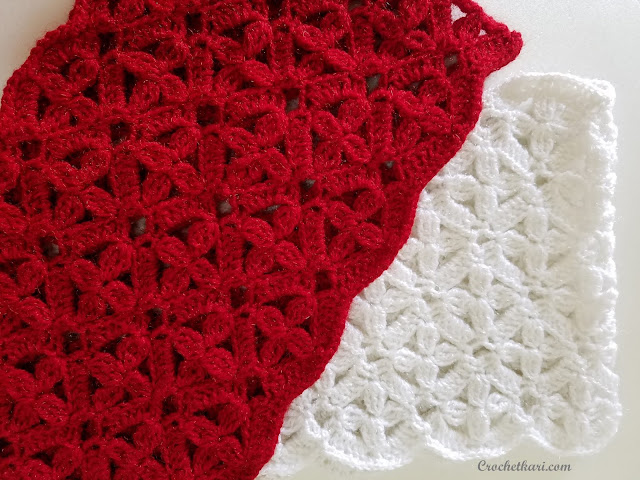
The inspiration for this cowl pattern was a small crochet chart diagram on Pinterest. It looked like small four-petaled flowers strewn across a lattice background.

Flowers in my window cowl crochet pattern pink close-up

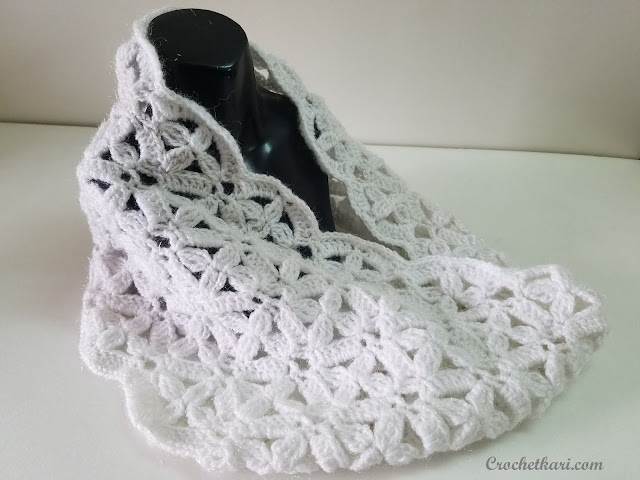
At first glance, it may look like many motifs have been joined together, but the cowl is worked in one piece. And it is worked in the round no there is no seaming involved.

Flowers in my window cowl crochet pattern by Crochetkari

I modified the pattern slightly to make it seamless. And like most of my patterns, this cowl too starts with a round of foundation single crochet, so no long chains to count.

Flowers in my window cowl crochet pattern by Crochetkari detail

Yarn:  DK weight approx 150 gms *
Hook: 4.50 mm *
Size: 40 inches around and 10 inches wide. The pattern also has instructions to change the length and width of the cowl. 

Flowers in my window cowl crochet pdf pattern by Crochetkari

The pattern PDF is available in my Etsy and Craftsy shops.

The cowl would make a gorgeous gift, just right for the coming festive season. Don't you think so?

Flowers in my window crochet cowl pattern by Crochetkari details

Let me have your thoughts on this cowl pattern in the comments below. You can also get in touch with me on Facebook and Instagram

See you soon with some more crochet goodness...

* This post contains affiliate links which if you use for any purchase, may yield me a small commission, at no extra cost to you. Thank you. 
Wednesday 17 October 2018

Baby steps and lots to share

Namaste friends, Mumbai is bedecked with flower garlands, strings of colourful lights and everywhere you can hear music that makes you want to get on your feet and dance. All this is in celebration of Navratri - the festival that celebrates Shakti - woman power, and the triumph of good over evil. I have mentioned a bit more about Navratri in this post.

Nav also means New and my BFF Ashlesha egged me on that there is no better time to begin my new foray back into blogging, to write my first post for 2018. So a big thanks to her for her encouragement.

Ahem... by the way, did you see I mentioned Mumbai above! Yes, my friends, we have finally moved back to Mumbai our hometown and we are thrilled to bits. :)
Seven years is a long time to spend away from your family, siblings and friends. But I will always have fond memories of Ahmedabad - the clean and beautiful roads, the tons of fast food options and of course the lovely friends I have there.

Year 2018 brought a lot of wonderful things for us;
- Hubby was offered a new job in Mumbai - hence the move back,
- we shifted to a new house near his workplace, where I got one room especially for my yarn!!
- our son completed his Masters and
- we went to the US for his convocation!! 

Unfortunately, in all this excitement, my blog was neglected, but always on my mind. Now how does one get back into things after such a long gap? With baby steps of course! :)

Now the good thing is that through all this, I was crocheting like crazy. Had to, as that is the only thing that kept me from going bonkers. Even crocheted on the plane from Mumbai to Atlanta and then back from New York to Mumbai! I have a set of wooden crochet hooks specially bought for this purpose. Can't afford to lose my special favourite hooks in airport security, you see. ;)

Here are pics of some of the items I have made. Each item will get a separate post later with all the details.

Flowers in my window cowl crochetkari

Pastel C2C blanket crochetkari

Cardamom blossoms crochetkari

Lydia crochet blanket crochetkari

Puff and shell cowl

Crochet flower cowl crochetkari

If you have reached this point, thank you so much for visiting my blog and sticking around. Do watch for the next post as there will be free patterns.

I have added tons of crochet books to my collection which I will share in a later post.

Also, I am now conducting crochet classes and I am super excited about it. More details will be shared on the blog later.

Let me know which of the above projects has piqued your interest.
Or just drop a few lines in the comments. it will mean a lot to me.

See you later, crafters :)

Sunday 31 December 2017

Happy New Year!

Namaste friends, I hope you are looking forward to 2018. I certainly am, and I am hoping it is filled with tons of crafty goodness. Sending you loads of heartfelt best wishes.

HappyNewYear2018

Thursday 30 November 2017

Harmony Cowl Free Crochet Pattern

Namaste friends! 

I am sure many of you are frantically crocheting/knitting/sewing/crafting to get your gifts done in time. So it seemed like the perfect time to share my pattern for the Harmony Cowl.
Harmony cowl free pattern
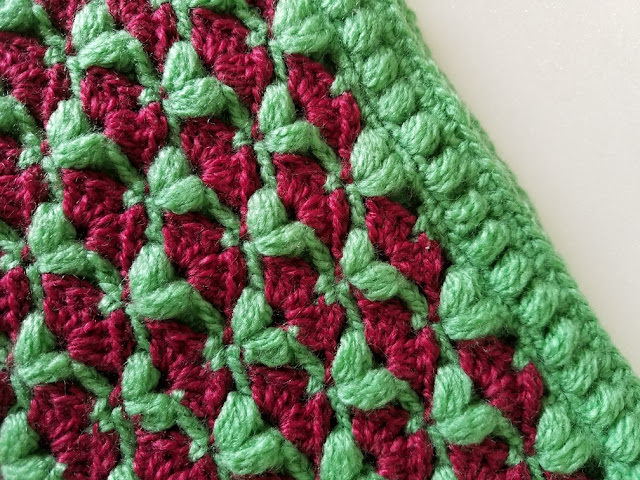
When two of my favourite crochet stitches blended harmoniously to make this cowl, Harmony seemed like an apt name for it.

Harmony cowl free crochet pattern

I like the Camel stitch as it creates a really elegant stitch with a faux knit look and is wonderful for edges. The moss stitch is dainty and produces a soft, lovely fabric.

Harmony cowl pattern border

The Harmony cowl pattern ticks so many boxes - it is unisex, chainless, seamless, a stash buster and works up in a jiffy. Use as many colours as you like in the body of the cowl. The light brown cowl has four colours and the cream cowl uses three colours in the body. 

Harmony cowl Cream

Now onto the pattern:

Materials:
For light brown cowl:
100 gms of worsted weight yarn in Main colour - A) light brown
20 gms (approx) of worsted weight yarn in each of the three different colours 
- B) cream, C) salmon and D) peach.

Hook: 5 mm

Finished size of cowl: 36" by 9"
Gauge: 16 sts and 16 rows = 4" in moss stitch
~~~~~~~~~~~~~~~~~
For cream cowl:
70 gms (approx) of DK wt yarn in Main colour - A) cream
20 gms (approx) of DK wt yarn in each of the two different colours
- B) red and C) blue.

Hook: 4.5 mm

Finished size of cowl: 32" by 8"
Gauge: 17 sts and 19 rows = 4" in moss stitch
~~~~~~~~~~~~~~~~

Stitch abbreviations (In US terms)
Fsc: foundation single crochet
beg: beginning 
ch: chain
sl st; slip stitch
sc: single crochet
hdc: half double crochet
sk: skip
rep: repeat
yo: yarn over
sp: space
Rnd: round

Special stitches:
Fsc: Foundation single crochet
Start with a slipknot, chain 2. Insert hook in second chain from hook, pull up a loop. Yo, draw through 1 loop - “chain” made, Yo, draw through 2 loops on hook - "single crochet" made. (1st Fsc made).  *Insert hook under the 2 loops of the “ch” st of the last st and pull up a loop, yo and draw through 1 loop, yo and draw through 2 loops. Repeat from * to make the required number of Fsc.
Camel stitch: this stitch is made by working a hdc into the horizontal loop, behind the front and back loops of the stitch. This loop is also called the third loop and can be seen on the wrong side of the fabric.
Moss stitch: On camel stitch round - 
1st round - Ch 2, *sk 1 hdc, sc in next hdc, ch 1, rep from * around. Join with sl st in 1st ch.
2nd round - with new colour, join with sc in any ch-1 sp, ch 1,  *sk 1 sc, sc in next ch-1 sp, ch 1, rep from around. Join with sl st in 1st sc. 
Rep 2nd round, using a new colour for every round.

The cowl is worked in the round, without turning, which means the right side of the cowl will always be facing you.

Rnd 1: Using main colour A) - keep a long tail and make Fsc 140 (refer Special stitches),      Join with sl st to first sc. 
Use the long tail to join the first "ch" to the last "ch" of the round thus closing the first round.

Rnd 2: Ch 1, pull up the loop to the height of a hdc, make a hdc in the horizontal loop behind the first sc below, work in camel st (or hdc in horizontal loop) around (refer Special stitches), join with sl st into the first chain.

Rnd 3 and 4: Rep Rnd 2.

Rnd 5: Ch 2, sk 1, sc in next st, *ch 1, sk 1, sc in next st, rep from * around ending with ch 1, join with sl st in first ch of beg ch 2.

Rnd 6: Using colour B) - Join with sc in any ch 1 sp, ch 1, *sk 1 sc, sc in next ch-1 sp, rep from * around ending with sl st in first sc.

Rnd 7: Using colour C) - Rep Rnd 6

Rnd 8: Using colour D) - Rep Rnd 6

Rnds 9 to 12: Rep Rnds 5 to 8 maintaining the colour sequence. #

Rnds 13 to 16: Rep Rnds 5 to 8.

Rnds 17 to 20: Rep Rnds 5 to 8.

Rnds 21 to 24: Rep Rnds 5 to 8.

Rnds 25 to 28: Rep Rnds 5 to 8. 
Colours B, C and D will no longer be used so fasten off each colour at the end of the respective round.

Rnd 29: Using colour A) rep Rnd 6.

Rnd 30: Ch 1, pull up the loop to the height of a hdc, *hdc in the horizontal loop behind the first sc below, hdc in back bump of ch, rep from * around, join with sl st into first chain.

Rnds 31 and 32: Rep Rnd 2.

Rnd 33: Rep Rnd 2, but work the camel st using SC INSTEAD OF HDC
This ensures that the upper edge of the cowl resembles the lower edge of the cowl.
Fasten off. Weave in the ends.

If the thought of weaving in all those yarn ends after each round seems daunting, here's a pic of the wrong side of my cowl.

Harmony cowl wrong side detail

I just carry my yarn up to the next working row. # This means that you end with Only Two ends of each colour to weave in! Great, right? 
If you would like me to show you this method of carrying the yarn up the wrong side in another post just let me know in the comments.

Harmony cowl Beige

I love this cowl and I hope you enjoy crocheting this pattern. I have made this cowl twice but if you find an error, be a dear and please let me know.

Friday 31 March 2017

Mandala mania 4 - Pretty Pastels + Giveaway winner

Namaste friends. It is crochet month so a mandala post is a must, right?

But before that let me announce the winner of the pattern giveaway for the Cupid's Dilemma cowl
And the winner is:
Susan Guard

Happy crocheting Susan. Your pattern is on the way to your Inbox. :)

This pattern is available in my Etsy and Craftsy shops.

And now on to my Spring inspired Pretty Pastel Mandala.

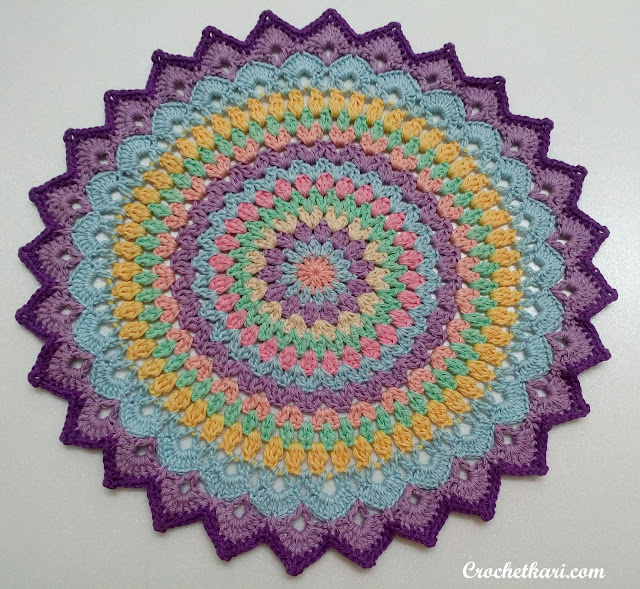
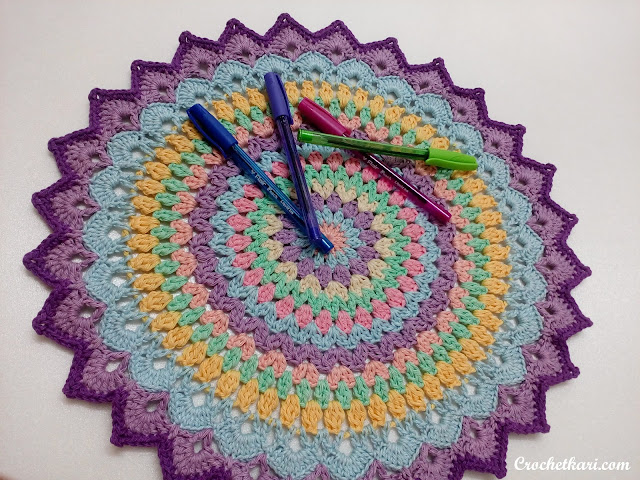
crochet lotus mandala

This is the fourth mandala I made using the same pattern. This mandala is a wee bit larger than the previous three mandalas as I modified Round no. 11 (in yellow), and made 3dc clusters instead of puff stitches.

crochet lotus mandala

Here are the details of the mandala;
Pattern source:   Crochet Millan.com
Yarn:                   Laura Knitting cotton
Hook:                  3.50 mm
Size:                   16 inches diameter

crochet lotus mandala

Here is a look at all four mandalas:

crochet lotus mandala collage

Check out mandala 1, mandala 2 and mandala 3.

Crocheting mandalas is very satisfying and almost meditative. Do give it a try.

Keep Calm and Crochet On.

Printfriendly

Print Friendly and PDF

Disclosure:

Crochetkari is a participant in various Affiliate marketing programs such as ShareASale, Flipkart, Target and Amazon. Any links to these sites may yield me a small commission, upon purchase, at no extra cost to you. Disclosure